I try not to frequent dollar stores but once and a while they carry a cool item that I can use for an art project or class. I’ve seen this dollhouse furniture several times but never thought much of it. After my doll house camp, it gave me an idea…can I transform this simple wood furniture into something cute? Here’s what I came up with.
wood chair before
After! A little paint and a fabric cushion, cute!
add a Maileg mouse, cuteness increase
bed before
I painted the bed and added some pillows and blankets.
I think these are great, for a dollar, you can create something pretty nice. They also had a table, two different dressers, and a buffet. The only problem with this dollhouse furniture is the scale. The chair seems to be 1:12 scale but the bed is something totally different and I’m not sure what it is. Not a huge problem if you just want have fun. They also have quite a lot of dried glue on them and need to be sanded smooth. Again, for what they are, I think they are cool and a fun way for kids (or adults) to make miniatures.
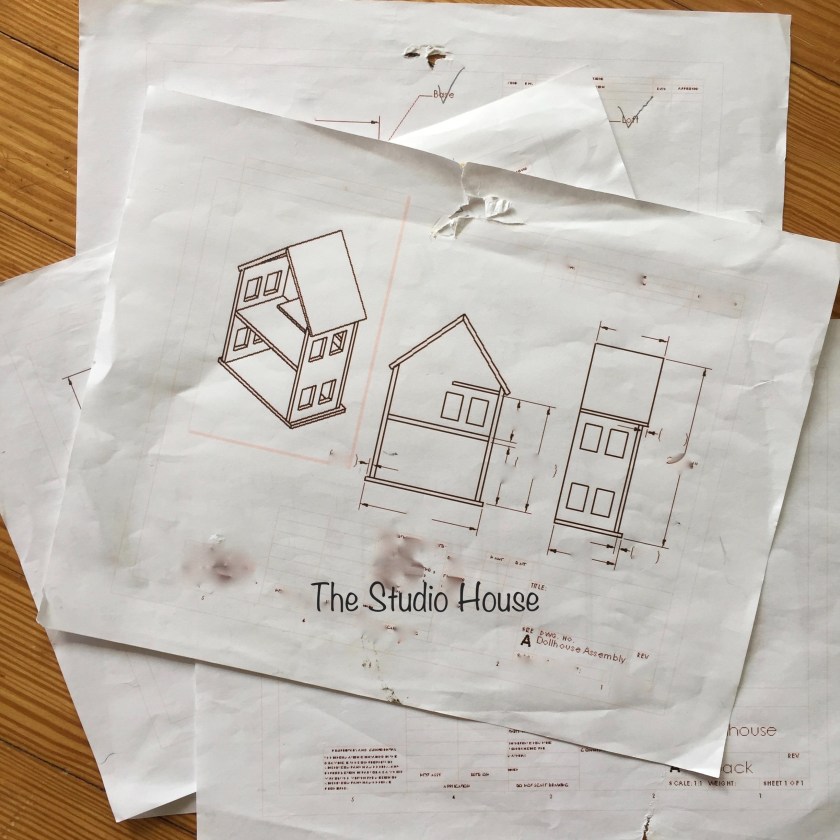
As a child, I always wanted little mini houses for my little mini dolls. I would take a rough idea (half drawn, half spoken) to my dad and ask him if he could make me a house out of wood. That’s easy, thought the 8 year old me. I remember being in his workshop, in the cellar (as we call it) trying to explain exactly what I wanted. Lofts and second story porches were always a must in my imagination. As an adult, I realize how much more actually goes into making something out of wood; designing a plan, figuring out dimensions, calcualting exact measurements, assembling, etc. Looking back, I am so thankful my dad did his best to try and create the idea that was in my head without any measurements or calculations.
Now, 30 or so years later, I take my ideas to my husband, Nick when I need help building something complex. My idea: Dollhouse Summer Camp. A week long summer class for kids who love making miniatures as much as I do.
First step, making a plan. Now again, in my head, this is fairly simple. This time I am prepared with my hand drawn sketch, labeled with dimensions. I used graph paper and a ruler! Nick looked at my drawing and, well….combine a detail oriented craftsman with a Mechanical Engineer, hours of work on the computer and, my simple sketch turned into a 6 page Solidworks drawing. Amazing!
I blurred out dimensions because this is our own custom design. The Studio House and BBN
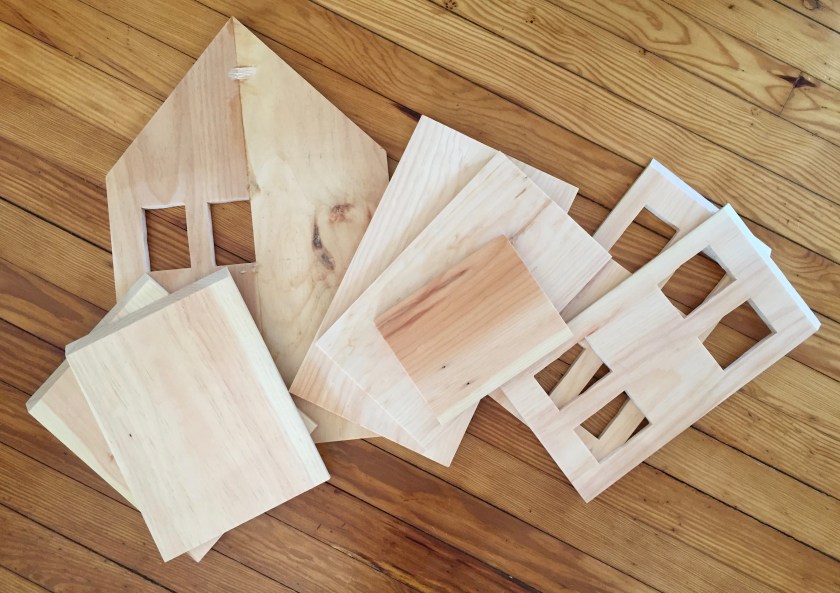
Next step, finding wood and getting it to the correct thickness. This took quite a lot of time and effort. We actually found the wood (clear pine) at a yard sale for free but needed to plane it down from 3/4″ to 1/2″. Next, cutting all the pieces based on the measurements from Nick’s drawing. Long story short, from all the wood we had, we were able to make 5 dollhouse kits.
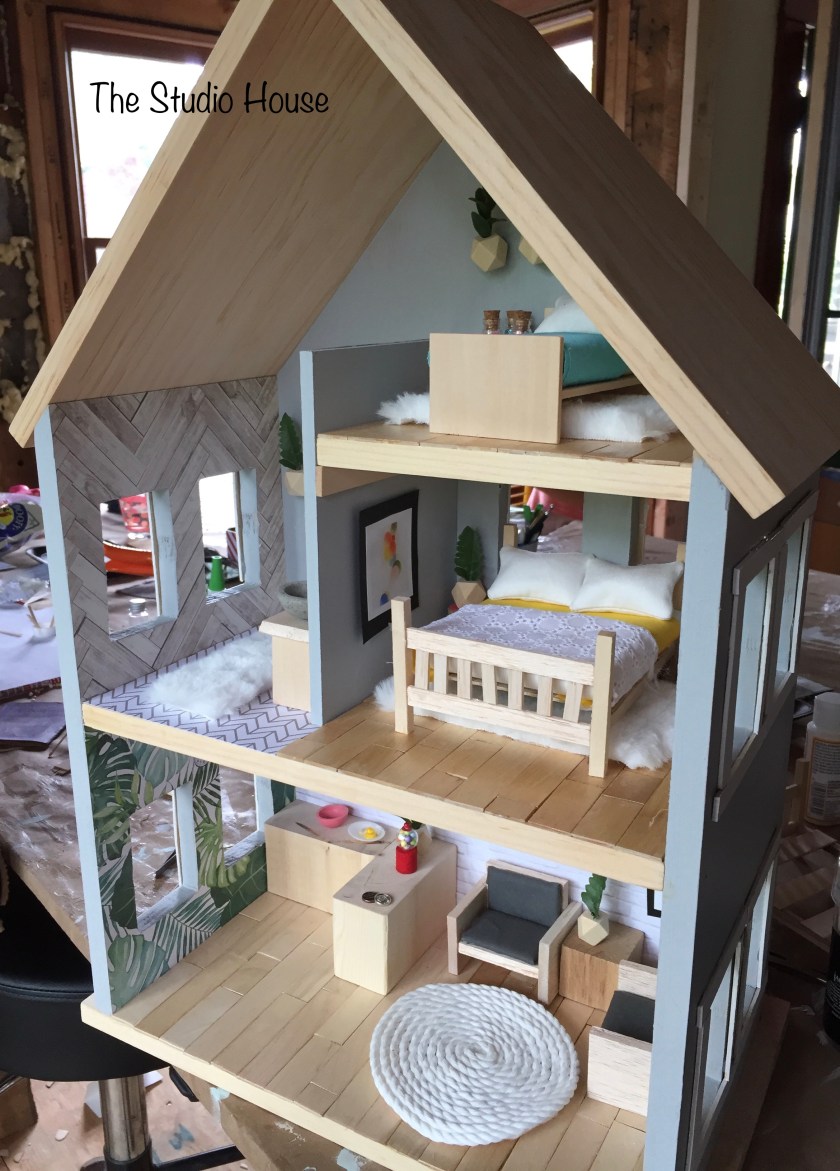
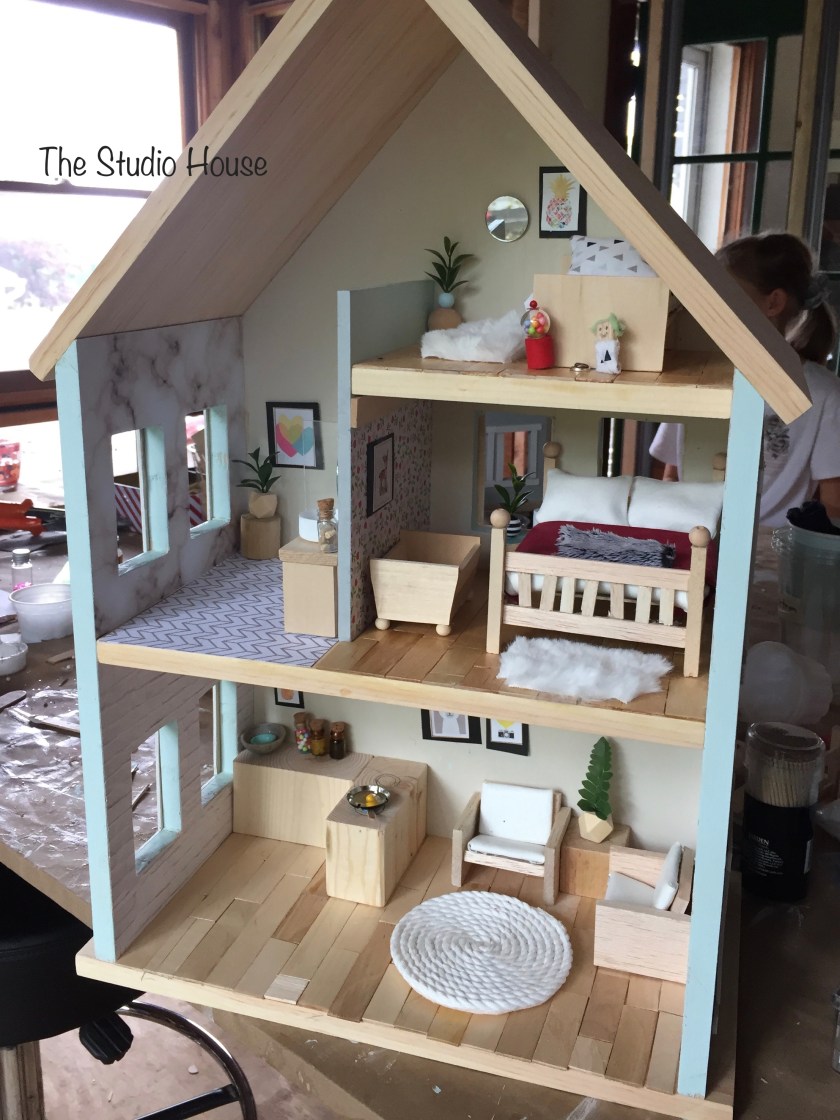
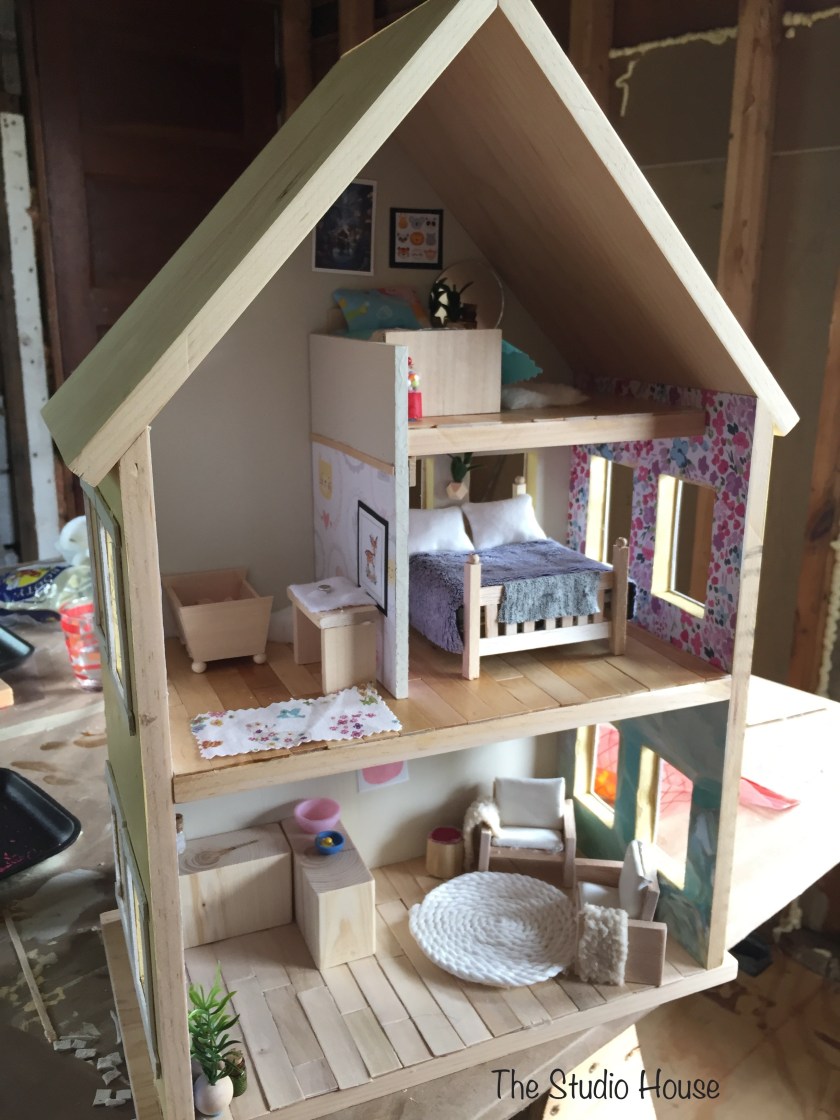
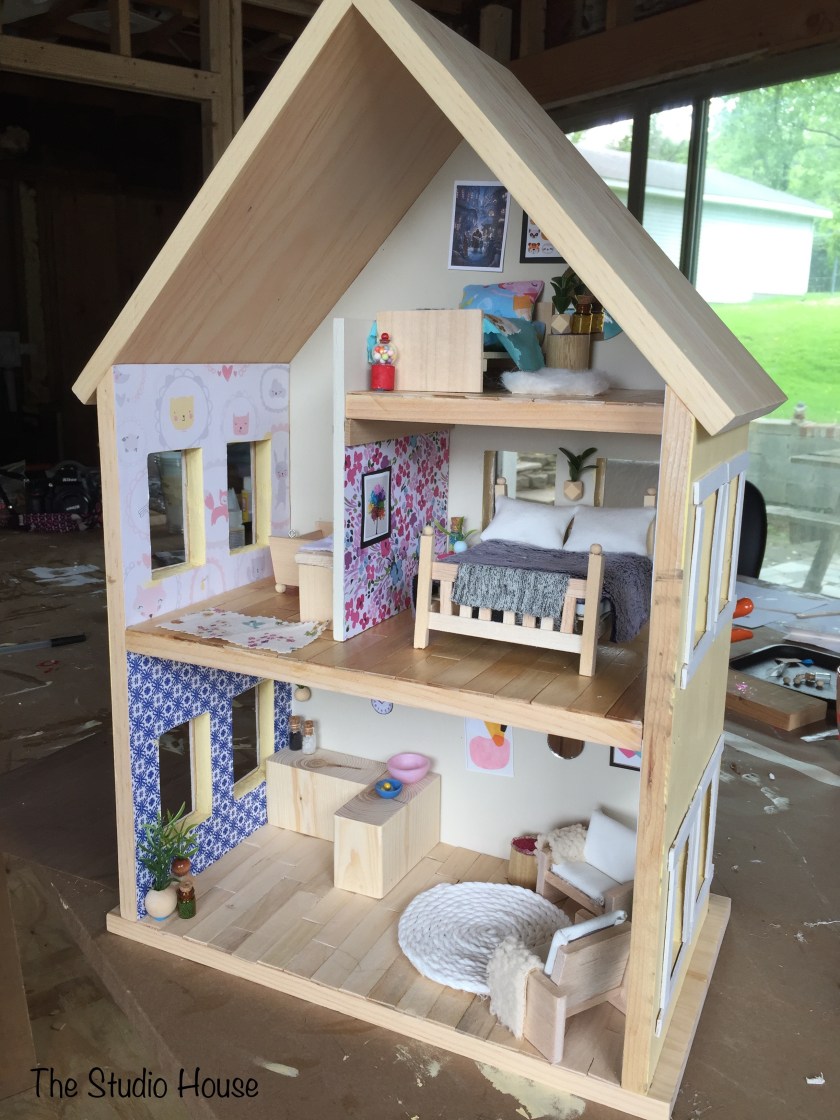
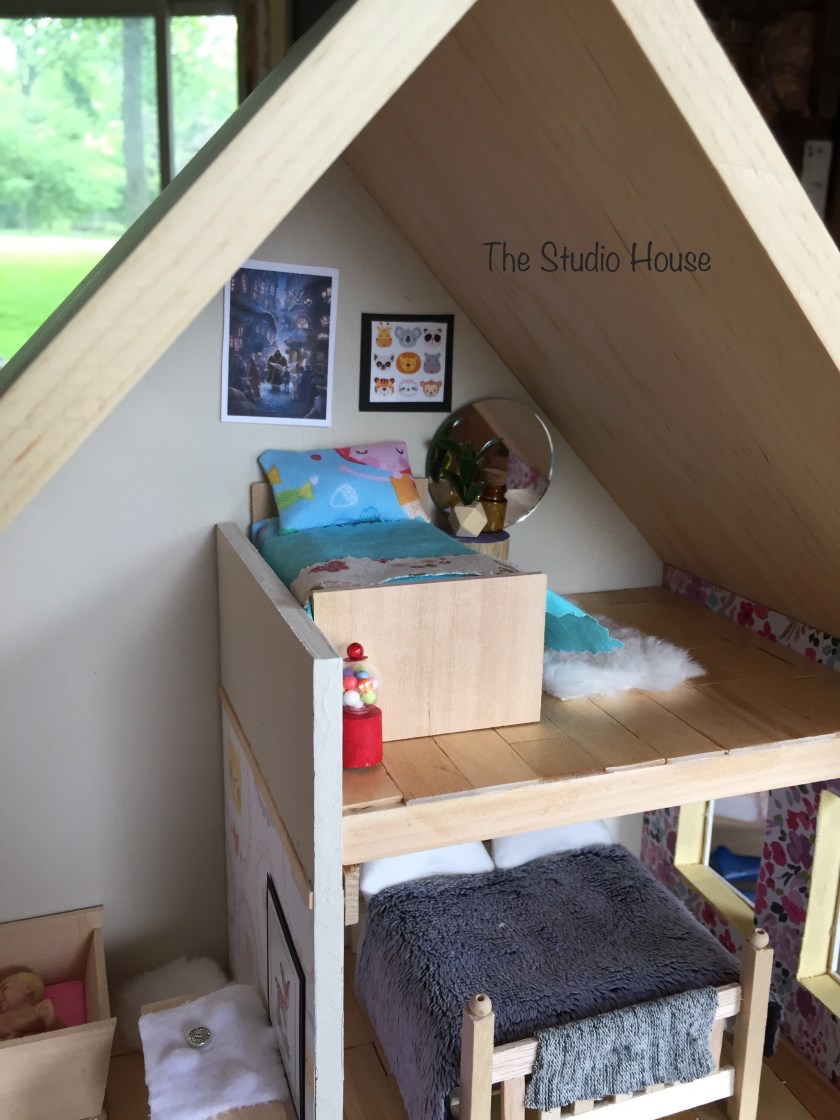
this is one dollhouse kit
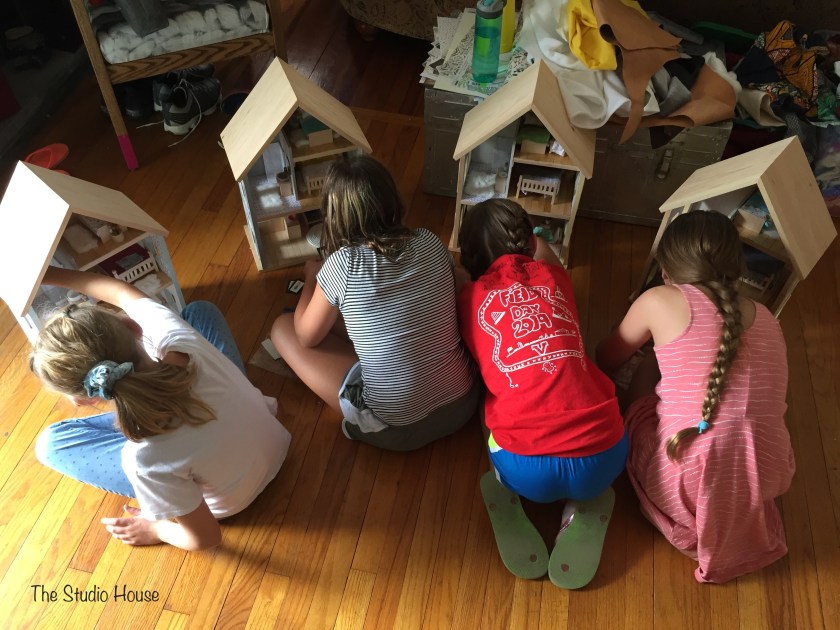
I have to pare down my story or this blog post will be too long. Fast forward to summer and I had four anxious students ready to build, make and create. Our work space was the construction zone in my house, that will soon be my new studio. It worked out great though because we didn’t have to worry about making a mess. They were each given the kit as you see above. The first steps were to paint, wallpaper and install wood floors. These steps are easier to do when the dollhouse is in pieces and laying flat.
painting the outside
they chose their outside color
wood flooring with jumbo pop sticks
wall paper chosen and glued down using Mod Podge
When most of the dollhouse structure work was complete, Nick and I assembled all of them using wood glue and a pin nailer. The kids were so excited to see their dollhouses put together the next day. They couldn’t wait to continue!
Then, we started making the little miniatures to go inside each room of the house. The first two pieces we made were beds: an easy one (3 pieces of wood) and a difficult one (many little pieces of wood). I gave them the dimensions, they cut all the wood and assembled the beds after I gave a demo.
We then just kept on making furnishings for the inside. There was quite a lot of prep work that I did before and after class each day…hours. I precut a lot of wood for the furniture (making little kits) simply for safety and time saving. During class, we worked for a solid three hours a day, for 5 days. It was labor intensive but we all had fun. You could feel the rush of excitement in the room on the last day when we were bustling around trying to finish, getting things ready to show the parents.
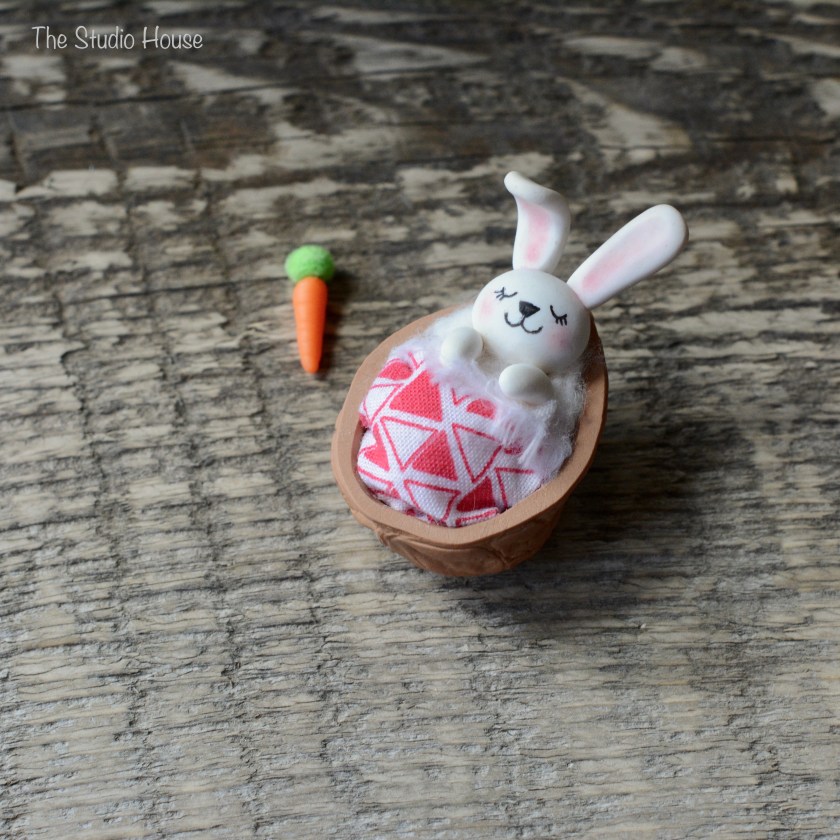
from left: the difficult bed, bathroom vanity kits, cradle kits and finished baby cradle, with all my notes written underneath 🙂
“braided” rugs, they were so impressed by how difficult these looked but how easy they were to make
busy hands sanding aways making mini plants
miniature plants
they just couldn’t wait to start putting things in 🙂
just can’t wait to put this in 😀
making little art for the house
Reflecting on the week, I think it was a huge success. I received emails from parents saying their child didn’t want dollhouse camp to end and that they were absolutely loving it. They were all extremely surprised by the outcome and the work they put into it. One girl told me she never thought she would ever BUILD a dollhouse! We could have worked for another full week, just to make everything I thought we’d have time for. But, the houses were beautiful, pretty darn cute and as I said, they LOVED all of it!
I loved this experience. It was a lot of work but also rewarding. I couldn’t have done it to this level of craftsmanship without my husband Nick who patiently helped from start to finish. I think we make a good team.
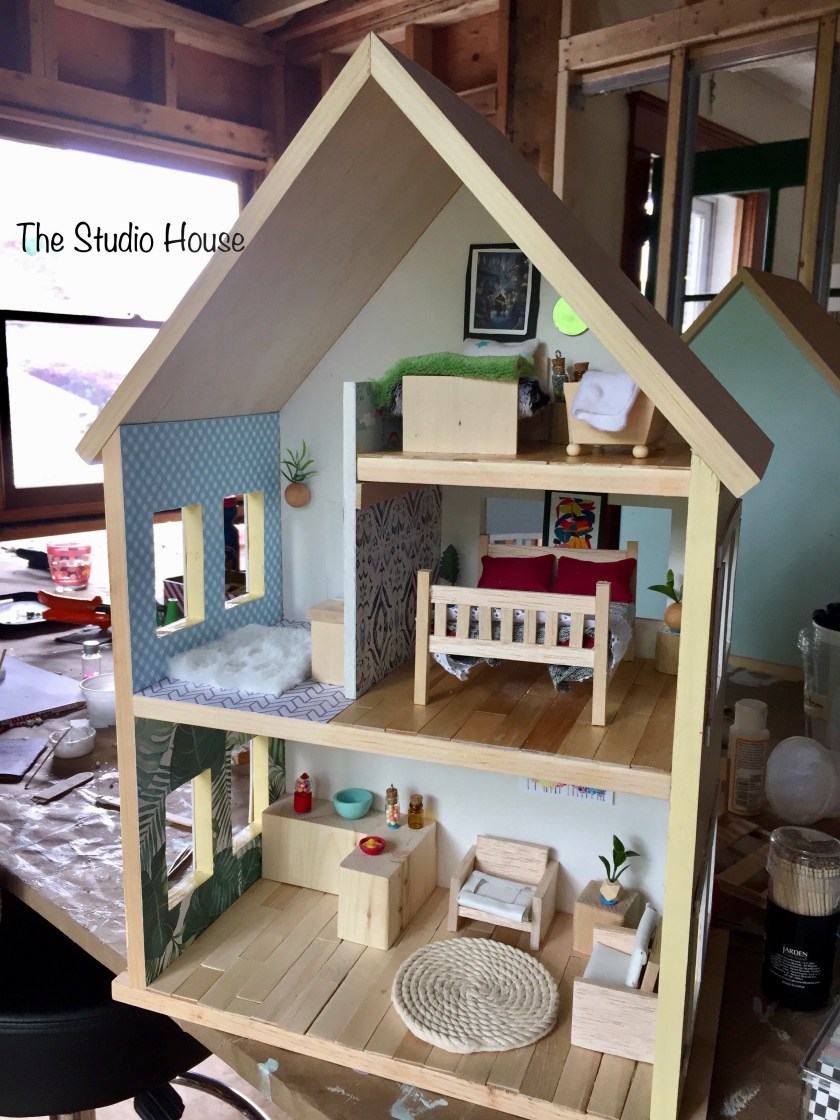
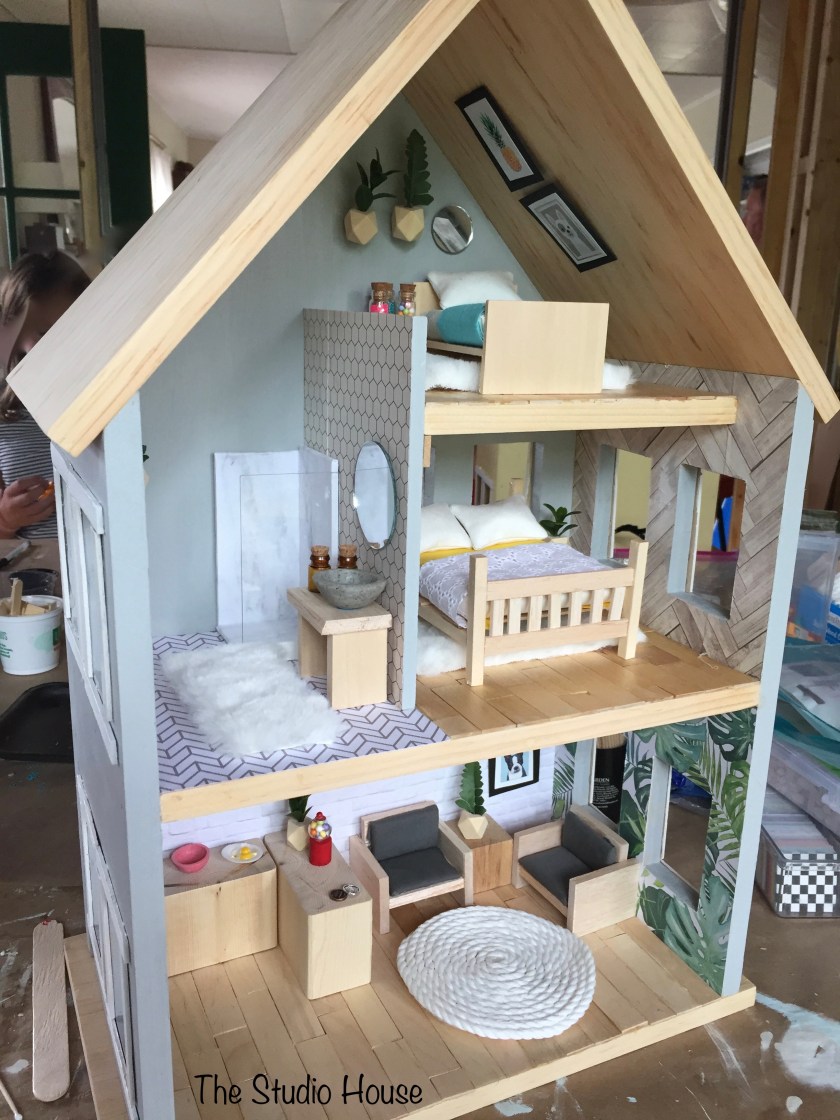
Without further delay, here are the houses!
Sadie’s Cape Cottage, first viewSadie’s Cape Cottage, second viewCate’s Happy Haven, first viewCate’s Happy Haven, second viewLillie’s Seaside Villa, first viewLillie’s Seaside Villa, second viewEllie’s Baby Bungalow, first view…she skipped the bathroom because she wanted a baby’s roomEllie’s Baby Bungalow, second view…she would bring in little tiny baby dolls during the week to make sure they fit, so cuteso cozy, I just want to shrink down and crawl in❤
A visiting priest at our church struck a chord with me on Sunday. A simple message but so spot on: What do we desire most in life? happiness. This isn’t new to me, I think about it often but it’s always nice to be reminded. While I was listening, it made me think of a recent art project I hosted at my house for a few local mothers in my town. Coming up with a project and making art with others brings me pure happiness. I’m pretty sure the feeling was mutual.
We made miniature doll house shadow boxes. It’s was a fun project that brought out the creative child in each of us. Adults love doll houses! If you haven’t seen my doll house makeover, click here.
The craft I created for my daughter’s 2nd grade, in-class birthday celebration: miniature gumball machines! After Christmas, when I was wandering through a local craft store, I found a 24 count tub of small, clear plastic ball ornaments. At the time, Christmas stuff was 80% off so I purchased all 24 for only $4. Class sizes in our school usually range from 22-24 kids, so I knew they would come in handy for a future project. And I was right! These were fun, simple to make, inexpensive and loved by all the kids.
I spent less than $20 on all the supplies! Supplies: plastic ball ornaments, pompoms, mini plastic cups, paper, metal washers, glue and red tape.
I love the colors ❤
the kids working
the kid’s gumball machines
my prototype
When I see a gumball machine, it makes me happy. When I was a child, my Aunt had a gumball machine in her house with a bucket full of pennies right below it. It was magical. I think they are timeless, something you can’t grow out of enjoying.
A recent St. Patrick’s Day project I put together for my daughter’s second grade class. I was a little uninspired when thinking about creating a craft for this day, only because it is kind of limited, but I think these leprechaun zipper pulls turned out pretty cute. The kids all really loved it too. Unfortunately, I didn’t get any photos of the kid’s finished work, these are my examples. The kids strung the beads, drew on the faces, added and styled the hair and their favorite part, used real blush to add the rosy cheeks.
A special day to celebrate love and giving, yes, it’s one of my favorites. I love the colors ♥ crafts ♥ the tiny signed cards ♥ the handmade mailboxes and it comes during the slow time of winter when you are just about ready for Spring. I always sign up for the class party in hopes that I will be chosen to lead a craft. This year I was in my daughter’s 2nd grade class.
This idea has been roaming around in my creative thoughts for a while. I didn’t invent the concept, they are pretty popular, but to prepare this project for a group of 23 kids, without spending a ton of money and to be completed in 20 minuets…that took some figuring.
My husband and my jig maker, Engineer, woodworker and calculator, usually cuts the wood for my projects. I was on a tight schedule and he has been so busy lately, that I just did it myself, because I could! (although I know he would have helped in a heartbeat). I found some 2″x4″ wood scraps out in the garage (from our current house renovation–my new studio) and used it to make a prototype—>it worked! I then found a full 2″x4″, cut it up into pieces on the miter saw and gave each one a light sanding. I liked the dimensions of the wood block because it could stand up on its own, no need to add hangers. While cutting, I was feeling thankful for my college professor, who taught us how to correctly use a miter saw in Painting 1 to make our own stretchers. A stretcher is the wood frame under the canvas.
Next step was hammering wire nails into the block in a heart shape. I then tied on a pre-measured length of yarn so each kit would be ready to go. This may look and sound like a lot of preparation, but it actually didn’t take a ton of time. All supplies for the entire project only cost around $13!
Even though it took some time to get the hang of it, every student loved this project! I agreed with them that it was challenging but told them I knew they could all complete it if they tried their best, and you know what?, they ALL did. After looking at my prototype, one boy came right out and told me that he didn’t think he could do it. After several attempts, he finished his piece! I could tell how proud and accomplished he felt. I like to challenge the kids just enough, the end results are more rewarding, for them, and me. I think these came out beautifully and the kids were pleasantly surprised with their work!
the prototype and supplies
wood block with wire nails
I ended up making 25 kits, I always like to have a few extra.
detail
They couldn’t stop looking at, holding and rearranging their finished work! 🙂
Two busy hours, a steady flow of kids, I was wiped out by the end, but it was so worth it! The kids LOVED both projects, especially the mini books. The table was filled with a flurry of creation for the entire night! I was so thankful for Sirli, another mother who helped at the bracelet table and also the mini book table when it was super busy. For more information on these two projects, click here.
As mentioned in a previous post, I was asked to come up with two art projects for 5th grade activity night, held at our elementary school. The night is free flowing, meaning kids get to decide which activity (games, dancing, food) they would like to do and how long they spend at each one. This means that my projects have to be simple enough to fit the “drop-in” aspect, yet engaging and hopefully awesome.
Over the last two weeks, I have spent hours preparing. A little too much time some may think, but to me, to get a truly unique and useful end product, you have to put in the extra work…and I do love it. Also, when you are fully prepared for a project with kids, things run so much smoother and it is more enjoyable for everyone. Here are the two projects I came up with.
(not your ordinary) Bracelets: These are great because the stretchy fabric can be tied by hand so no need for fasteners and they are surely one of a kind! I spray painted all the washers! Click on the individual photos for more written information.
Hand, spray painted washers (found at the hardware store) used in place of traditional beads!
Instead of buying pre-made cord, I used stretchy material (like Spandex) and cut it into 1″ strips using my rotary cutter and ruler.
After the fabric is cut, I just pulled the strips from the ends to create cord.
Mini Books: These sketchbooks are just the cutest little things! The supplies are simple, patterned paper, card stock, ribbon, and glue sticks. I think they end up being the perfect size to tuck into your bag or display on your doll’s bookshelf. The process of making them is quite simple and the end product is beautiful!
The thing that took me the longest to prepare—->cutting up all the paper! The ribbon book mark adds a nice touch, I always love when books have a ribbon in them.